This panel is located at the top side of the dashboard screen and remains consistently visible across all the screens of the FAB Studio interface. It enhances the user flexibility by providing quick access of profile settings and credit points management such as adding credit points for purchasing packages to enable code download. It includes the following tabs, arranged from left to right as mentioned below.

Screen- Header
- Expand/Collapse Toggle-This button is located at the top-left of the screen and represented by the symbol with <<. This button is used to collapse or expand the left navigation panel for better screen space or focus.
- Credit Points -This button displays the current number of available credits. Users can click on the “+” button to purchase additional credit through a secure payment gateway. These credits are required to access development services such as generating or downloading application code through the platform.
- Language Dropdown-The dropdown allows the user to select their preferred interface language. English is selected by default.
- Screen Toggle-This button is used to switch between light and dark screen modes for better visibility and workspace control.
- Profile Area-The Profile Area is located at the top-right corner of the navigation bar. It displays the profile icon, username, and workspace name—all of which are clickable.When the user clicks any of these elements, a dropdown menu appears. This menu provides quick access to important options such as:
- Profile
- Change Password
- Workspaces
- Sign out
These options allow users to easily update their personal information, change passwords, and manage workspace-related settings
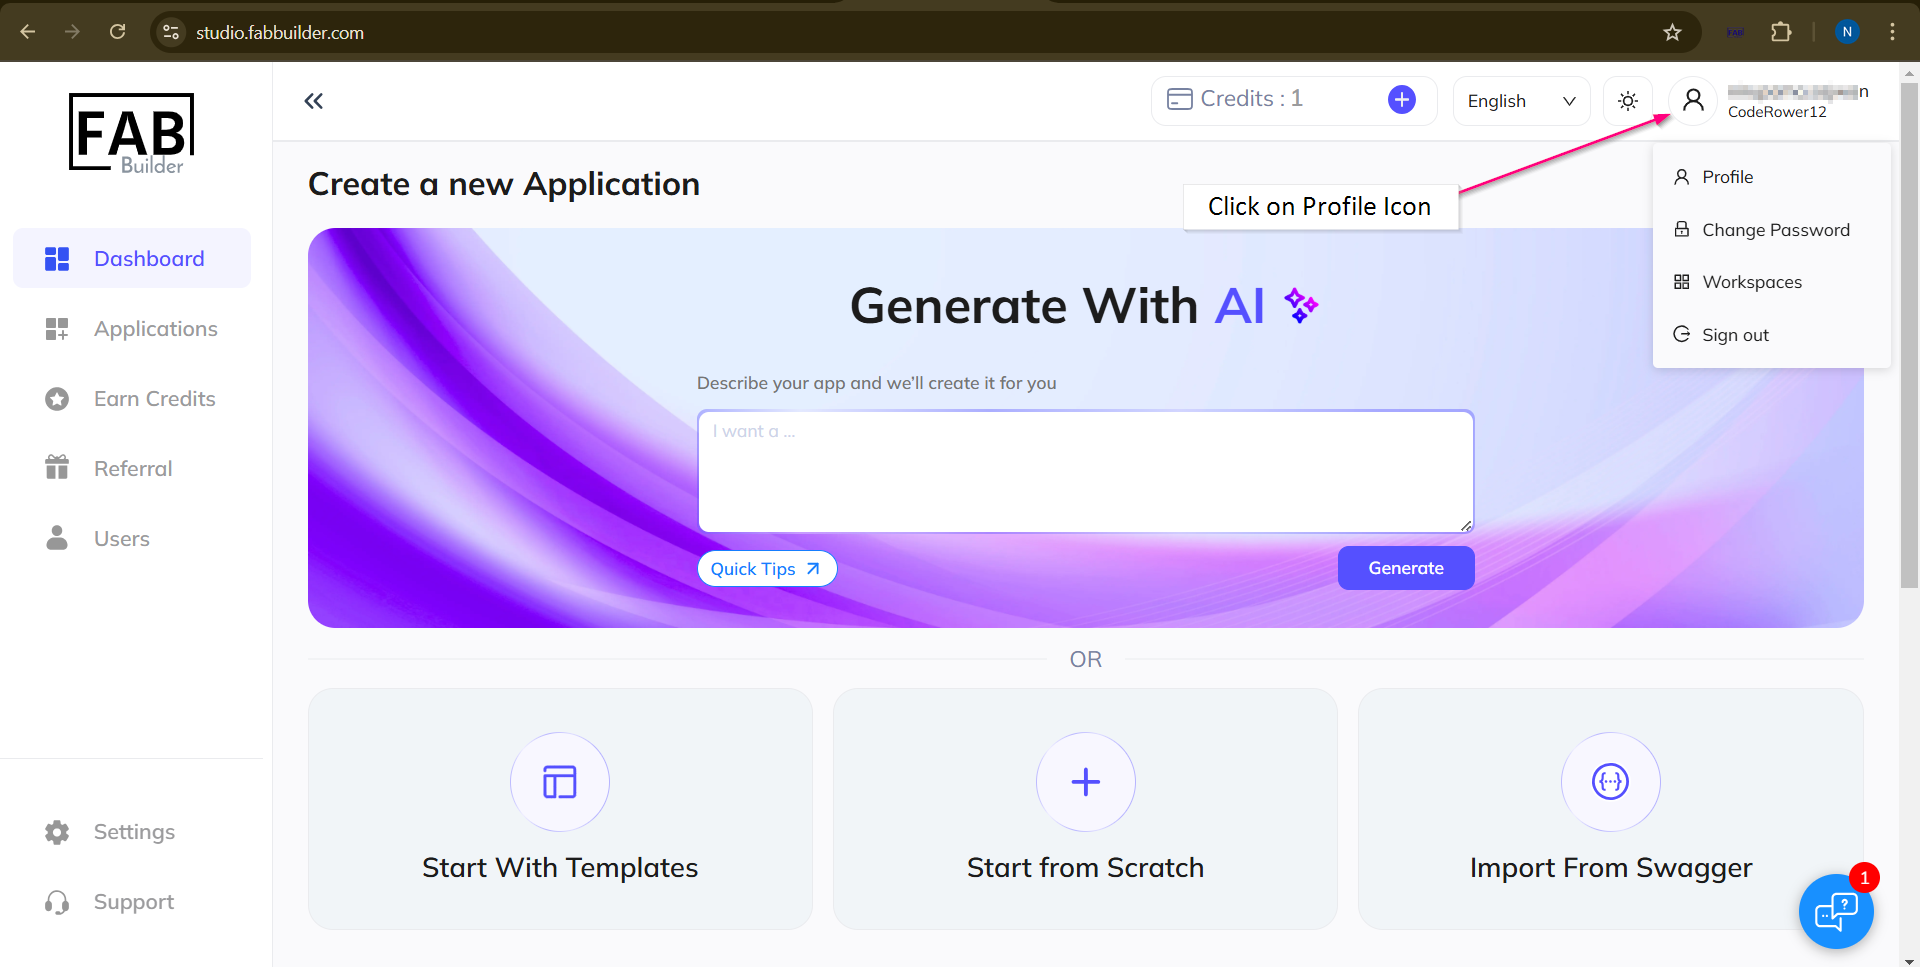
Screen - Profile setting Tabs
Profile
This tab (on drop down menu) allows the user to update personal details such as name, profile picture, and password.On Clicking on the profile tab opens a profile screen as displayed below.
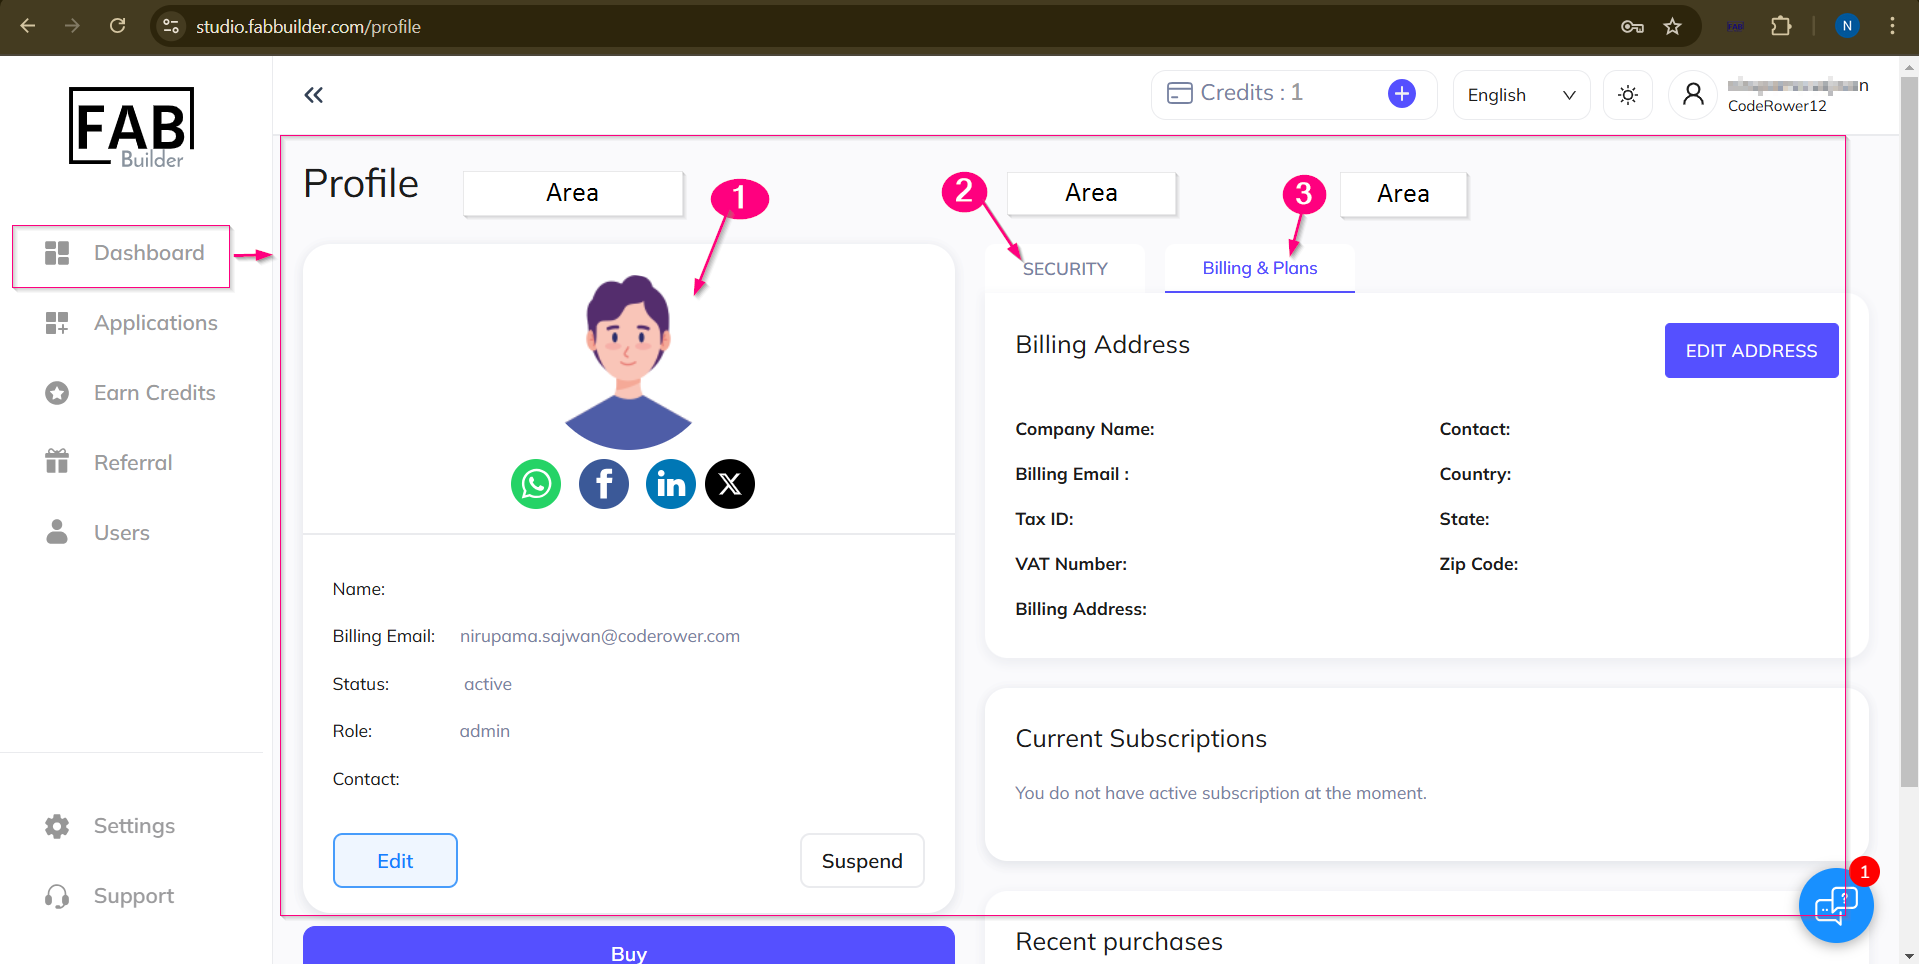
Screen- Profile Setting Area
The Profile screen offers the multiple features to allow the user to manage their account settings and access the additional services. All these options are clearly labelled on the screen for easy navigation. These include-
1. Edit Profile Area – This button allows the users to update the name, contact number, profile picture.This area also integrated third-party applications to send the messages and buy button to upgrade a subscription plan and upon selection by clicking on this button.
2. Security – It provides the security by changing the password and enabling two-step verification with additional safety feature.
3. Billing & Plan – This feature allows the users to change the billing address and view the detailed history of purchase.
Edit Profile
After navigating to Profile screen, follow the steps to edit the details mentioned below:
1.Click on profile tab.
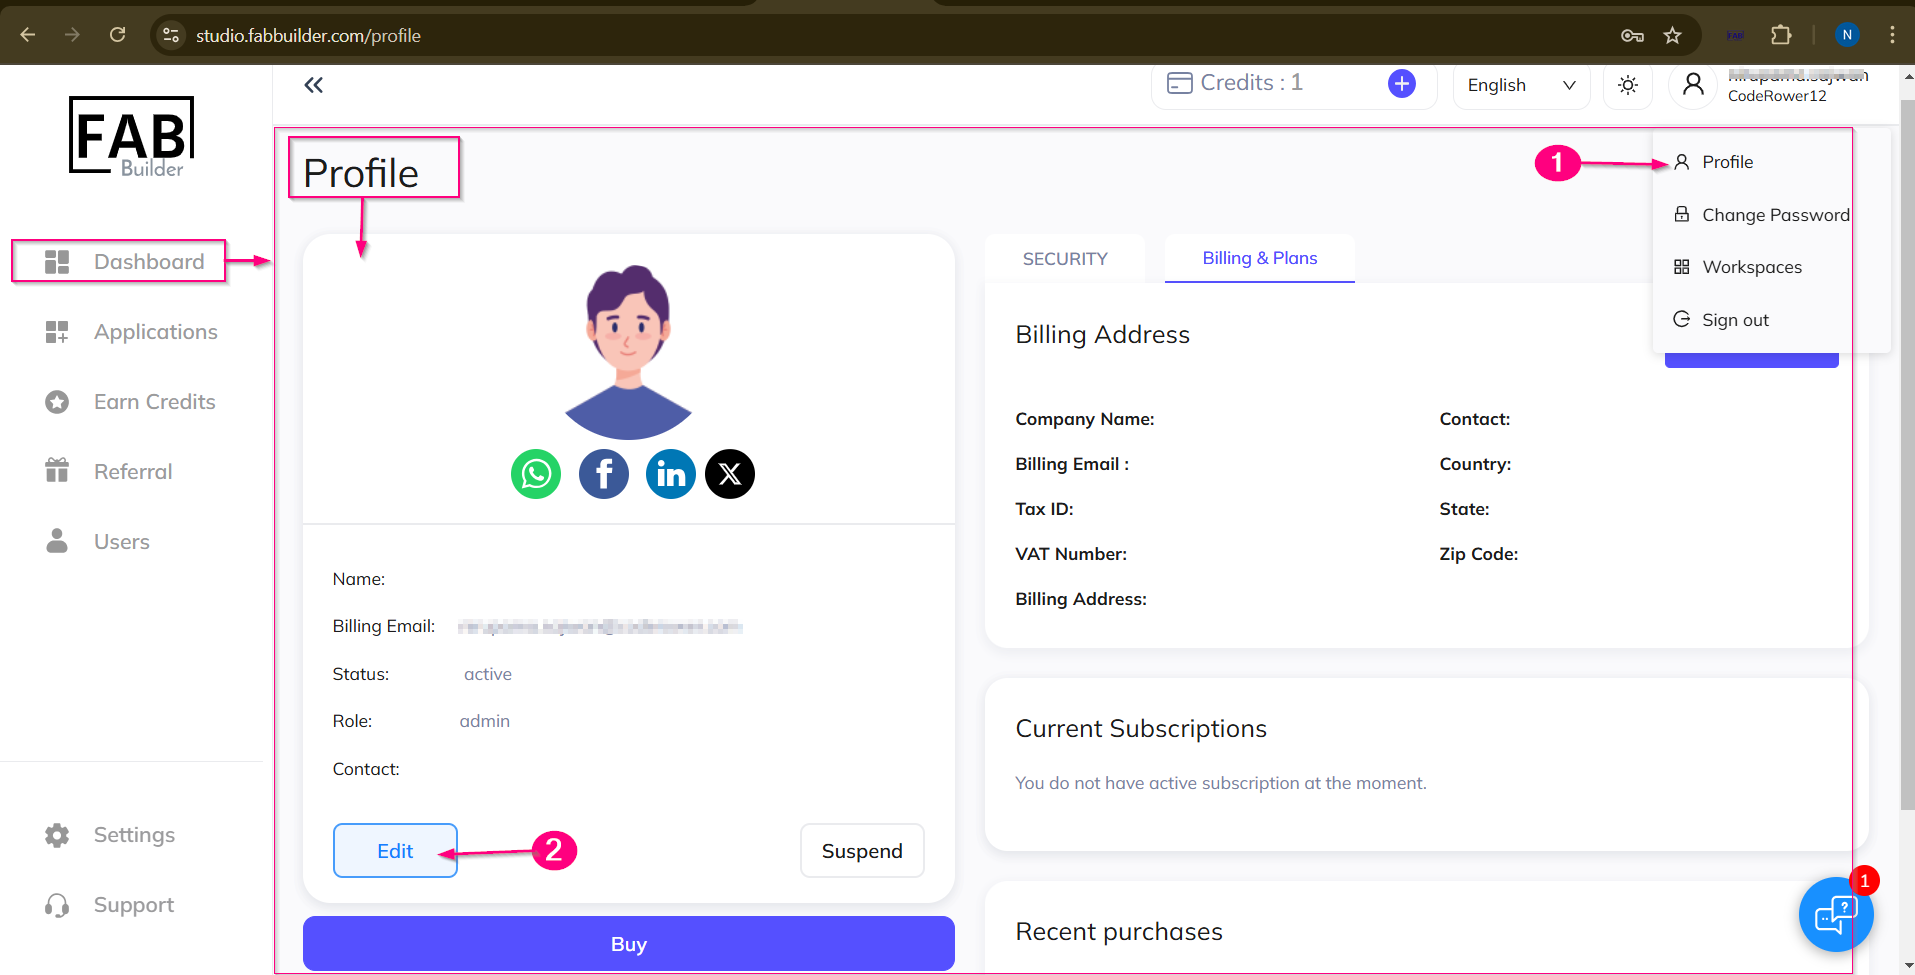
Screen -Edit Profile
2.Click on edit tab to change the detail. A New pop-up window will appear on the profile screen which includes the user’s email ID, name, phone number, upload photo option.
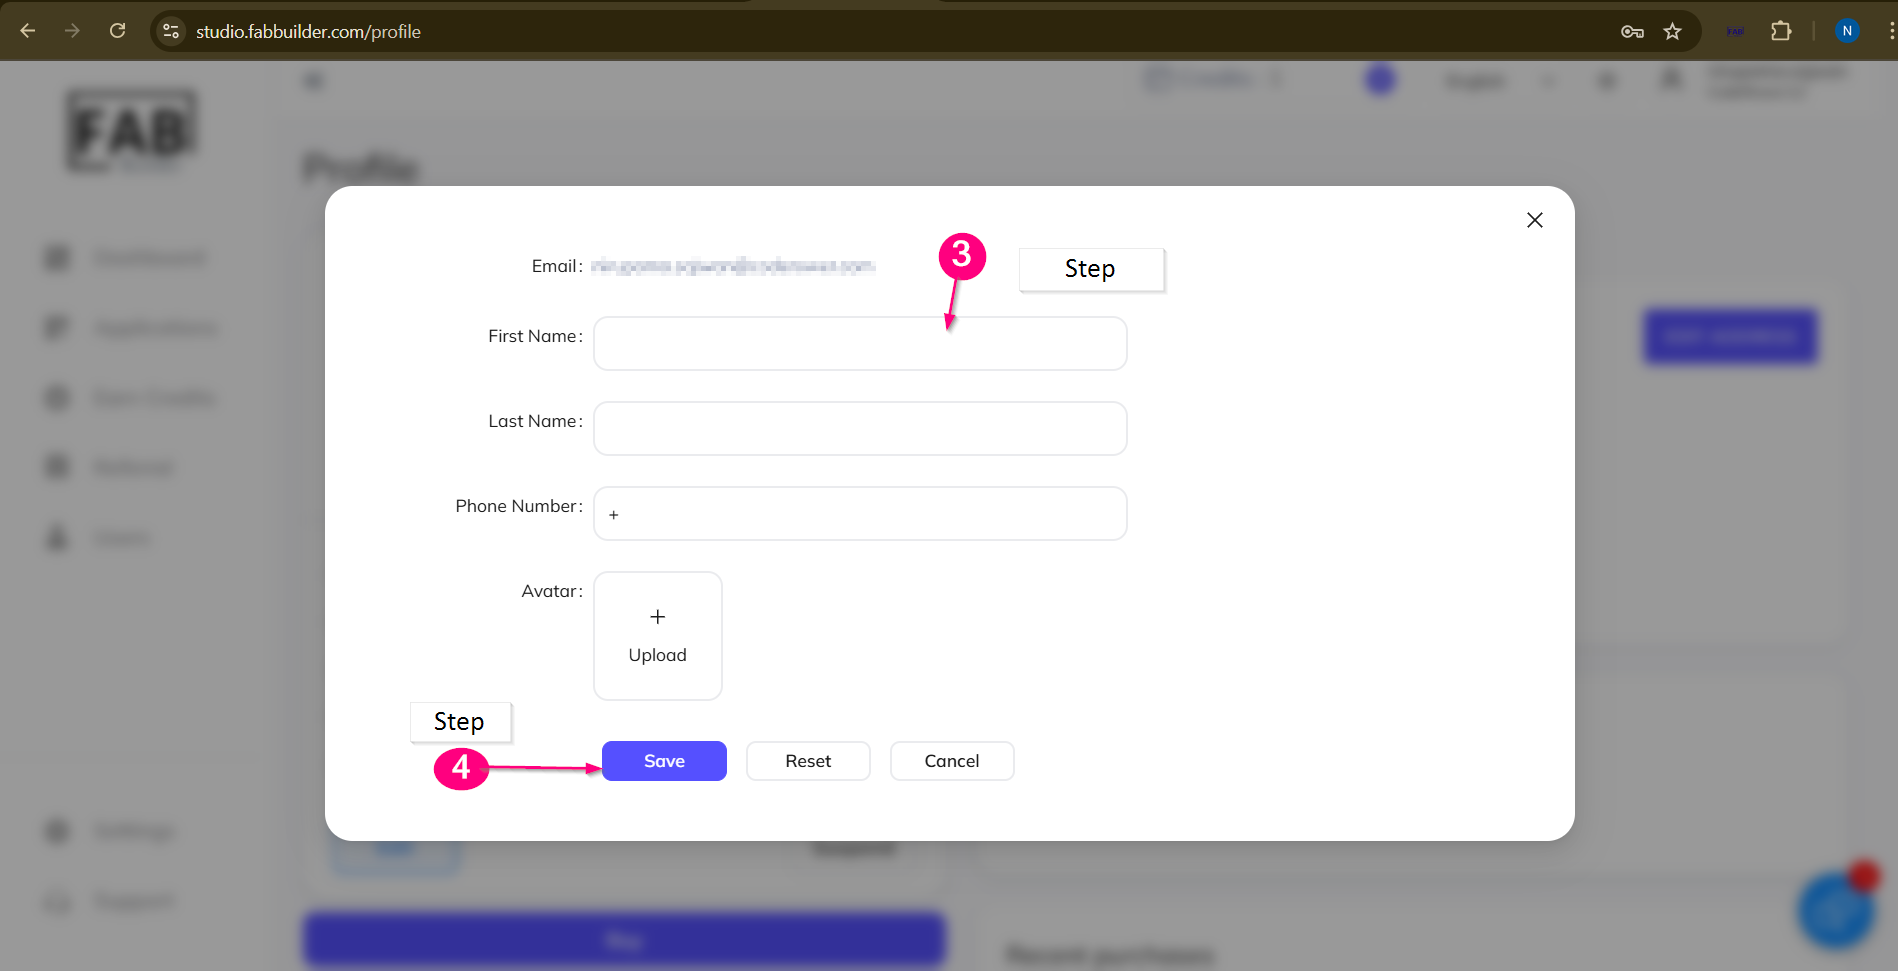
Screen- Profile Edit Form
3.Enter the new the details.
4.Click on Save button.
Note-The registered email address of user cannot be changed.
Edit Billing Address
To edit the billing address the user must follow the following steps:
1. Click on billing and plan tab. Now this tab will show active by turning blue and the screen will show the billing field details.
2. Click on the edit address button.
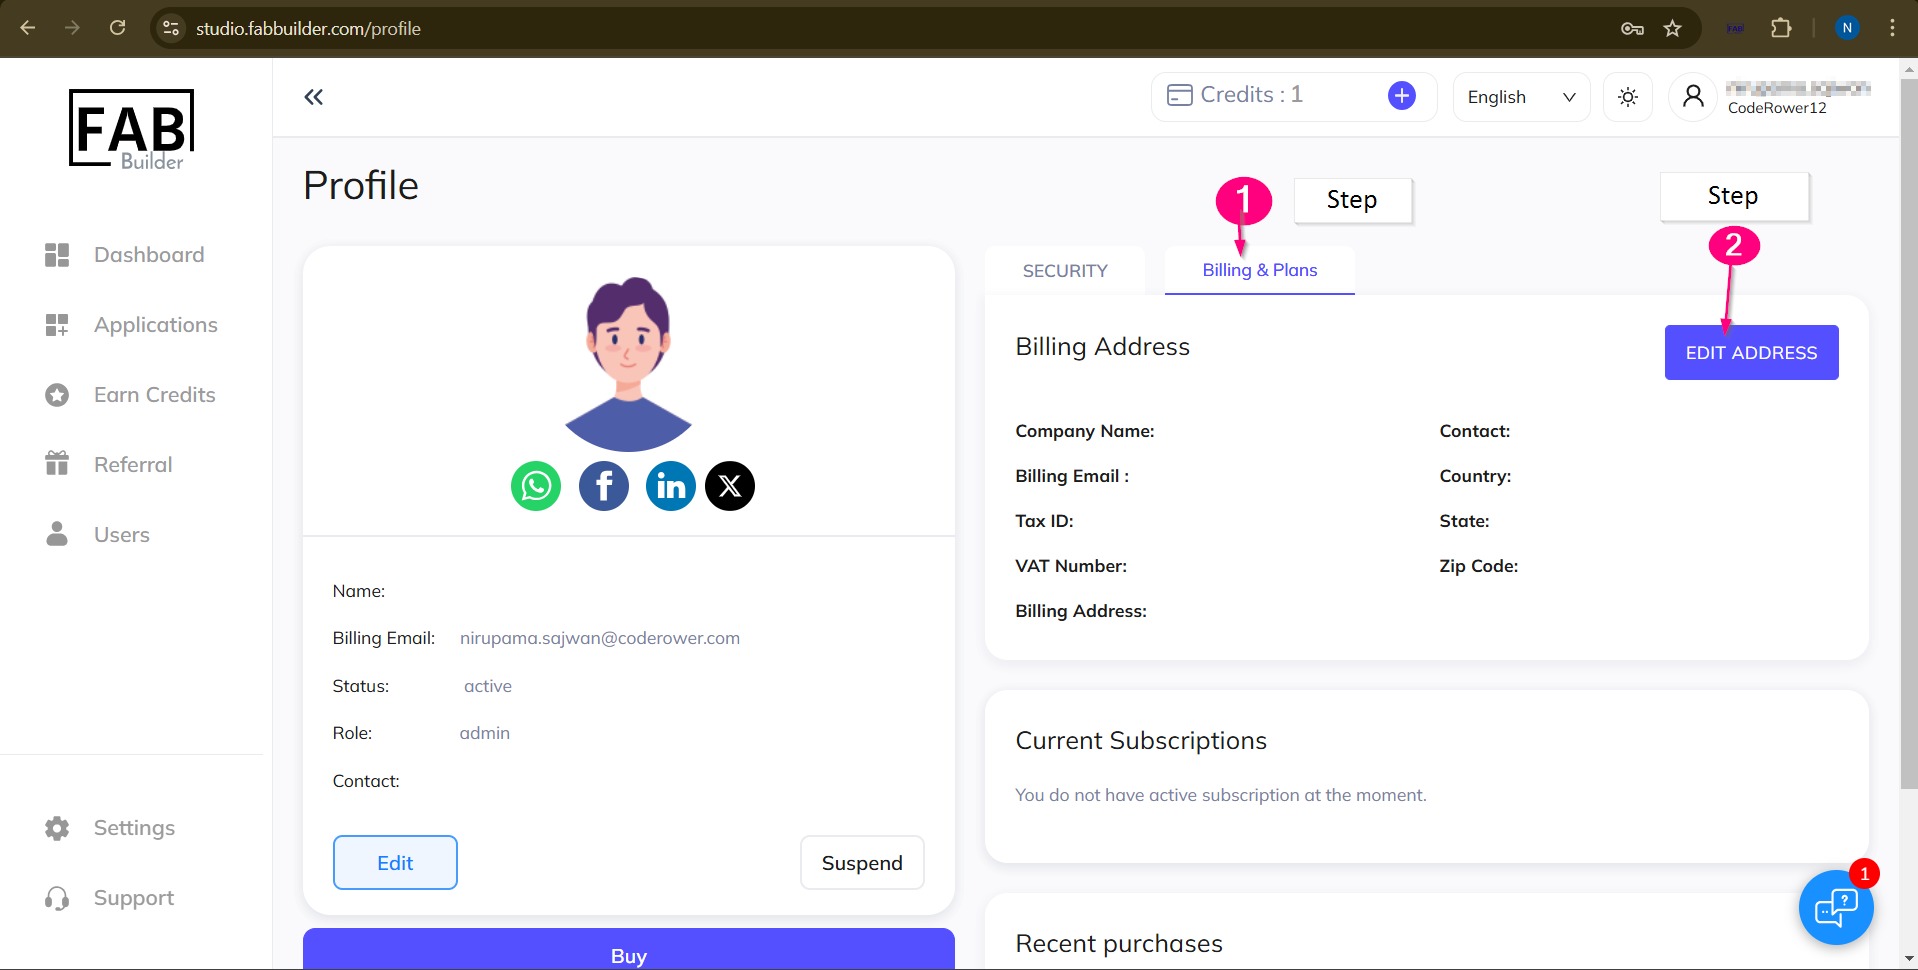
Screen – Edit Billing Address
View of the Recent Plan Purchase
Users can view the recent purchase by scrolling down the profile screen using tool bar, the user can view the recent purchase details.
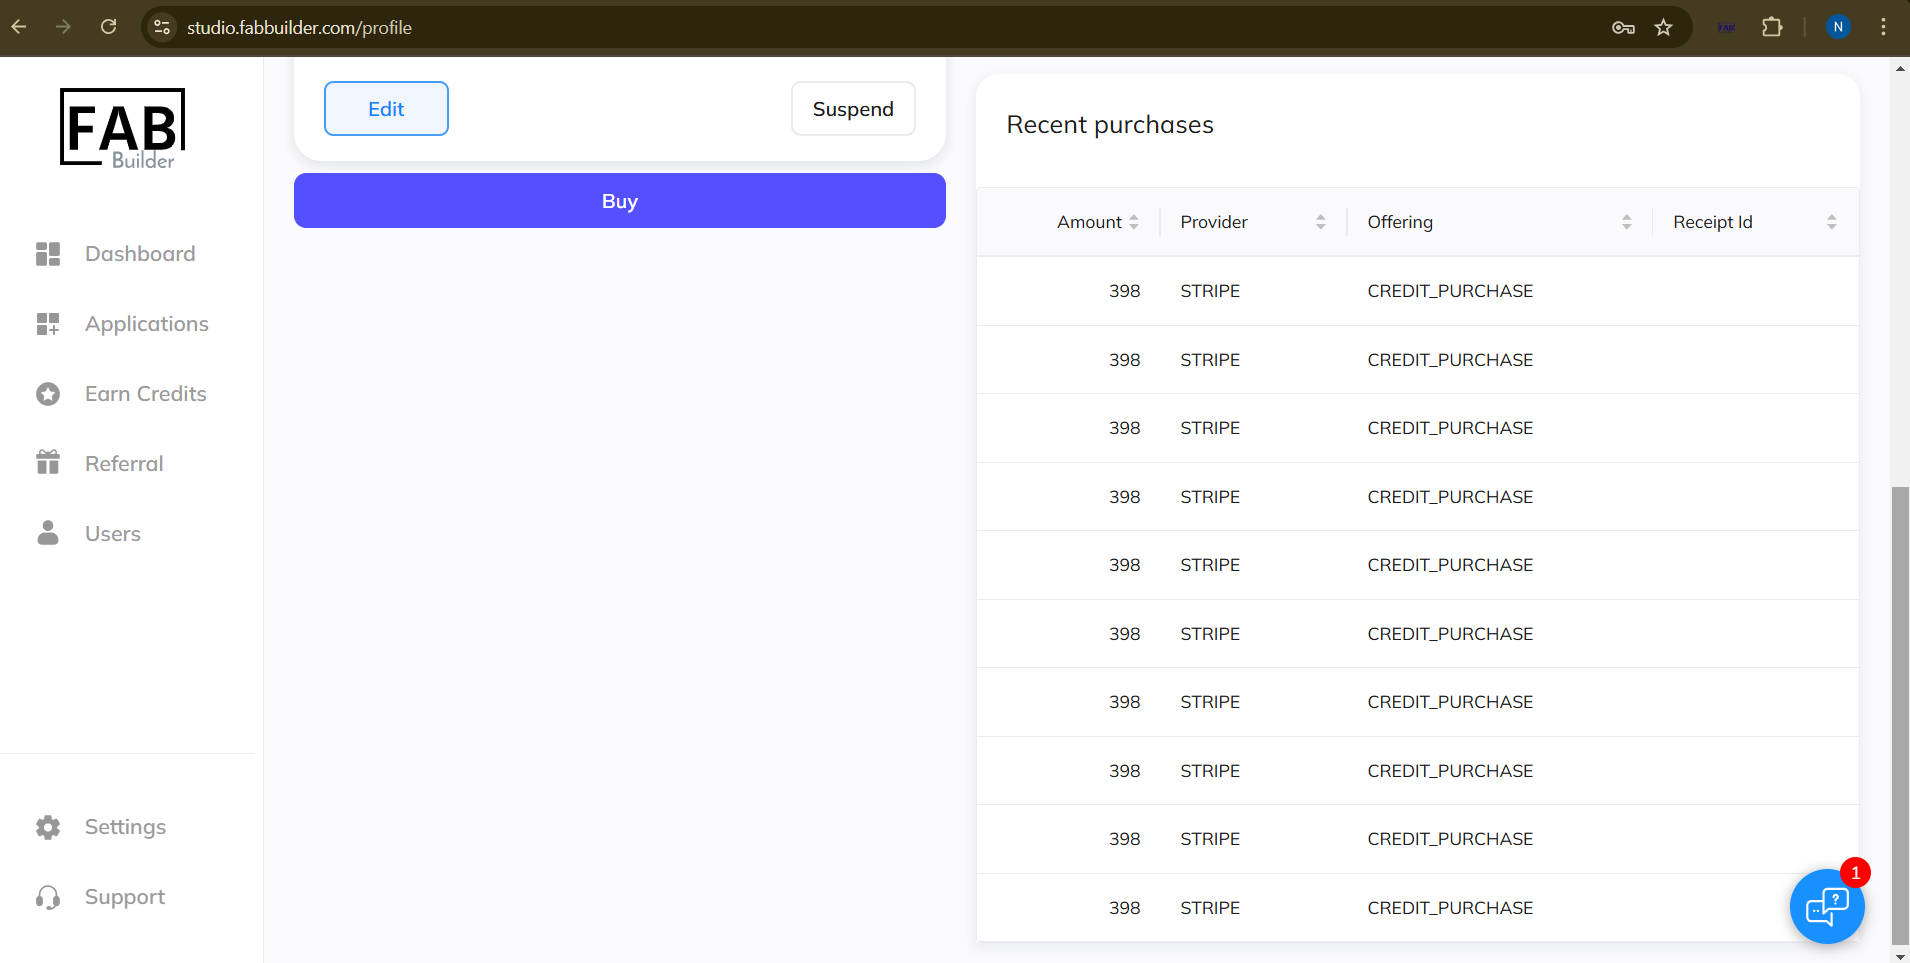
Screen –Recent Purchase Plan
Sending the Message
Profile screens allow users to send messages through the third-party app by selecting any one
of the available options.
1. Select any app to send the message. A new screen permission pop-up screen will appear.
2. Click on the check box to grant access.
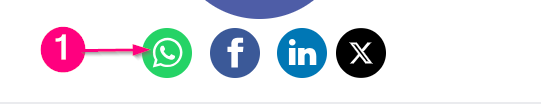
Screen – Message Application
3. Click on open WhatsApp on pop window screen.
4. A user can start messaging by selecting Continue to Chat or message tab.
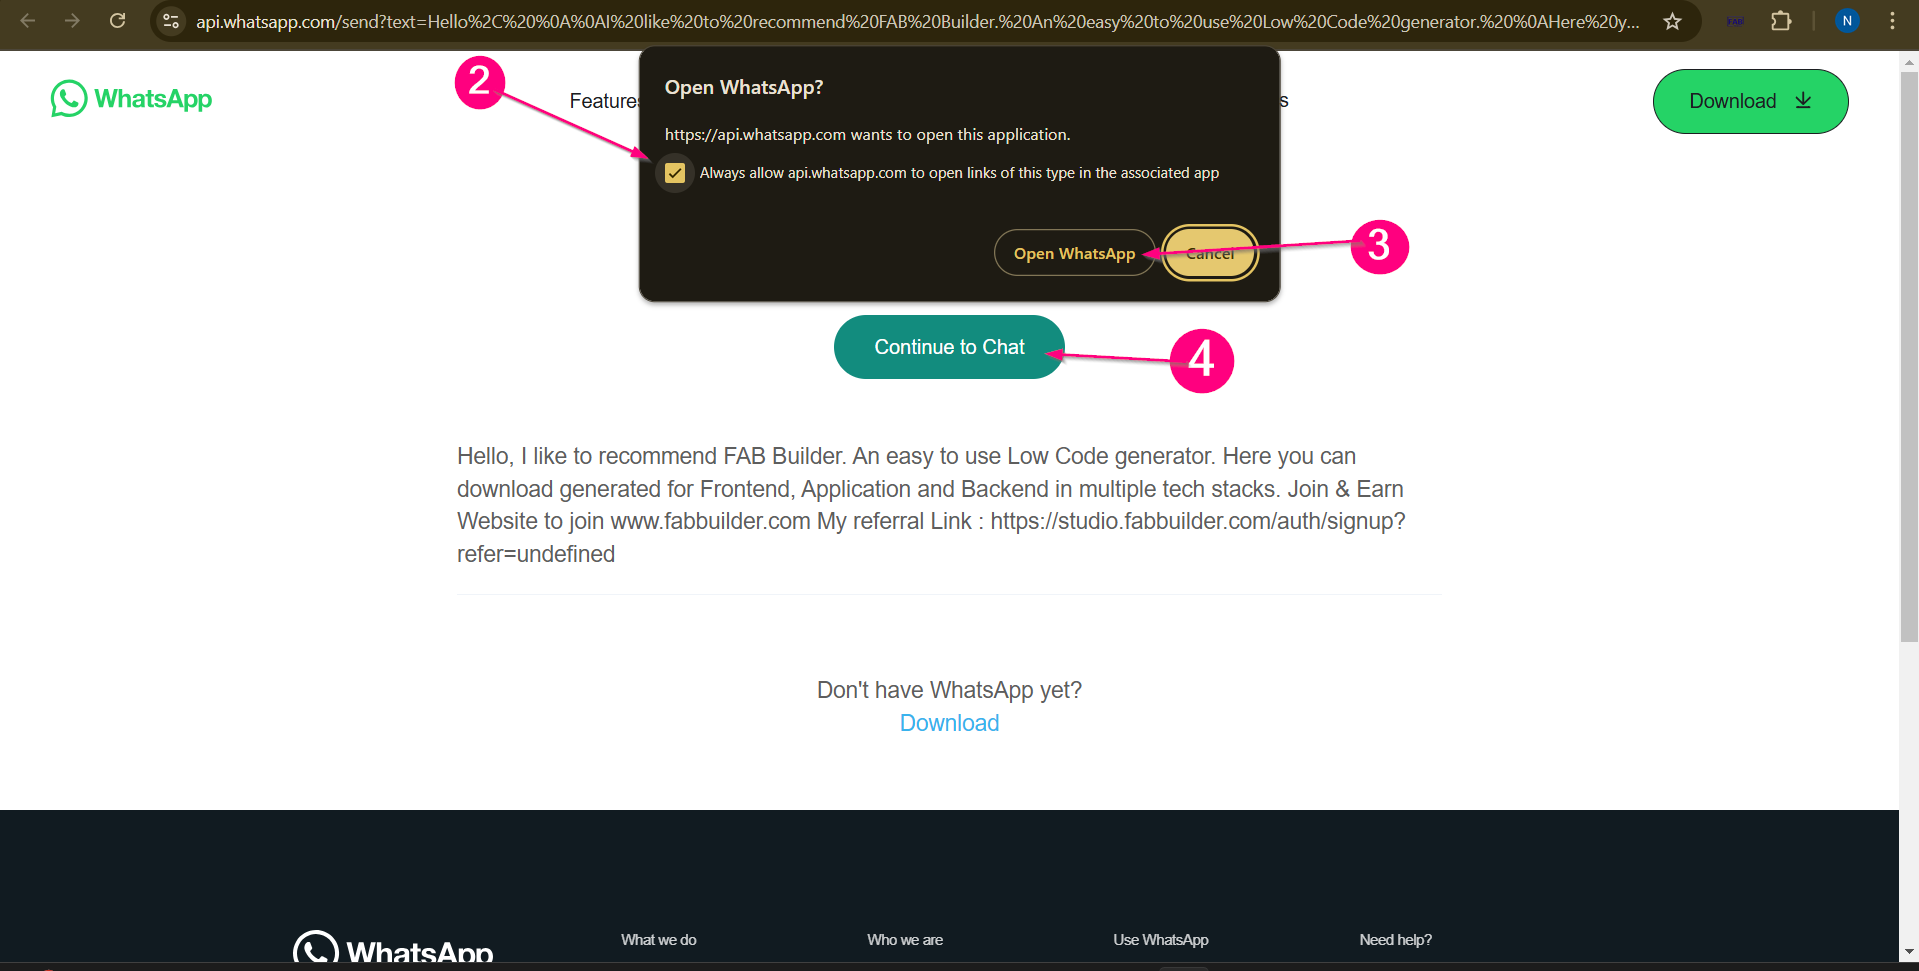
Screen – Chat/Message
1.1.2 Change Password
Users can change the password by clicking on the profile icon at the top panel. This action displays drop down menu, listing change password option.
1. Click on the change password tab shows the new screen of change password.
2.Fill all details of the old password, new password, confirm new password.
3.Select the change password button.
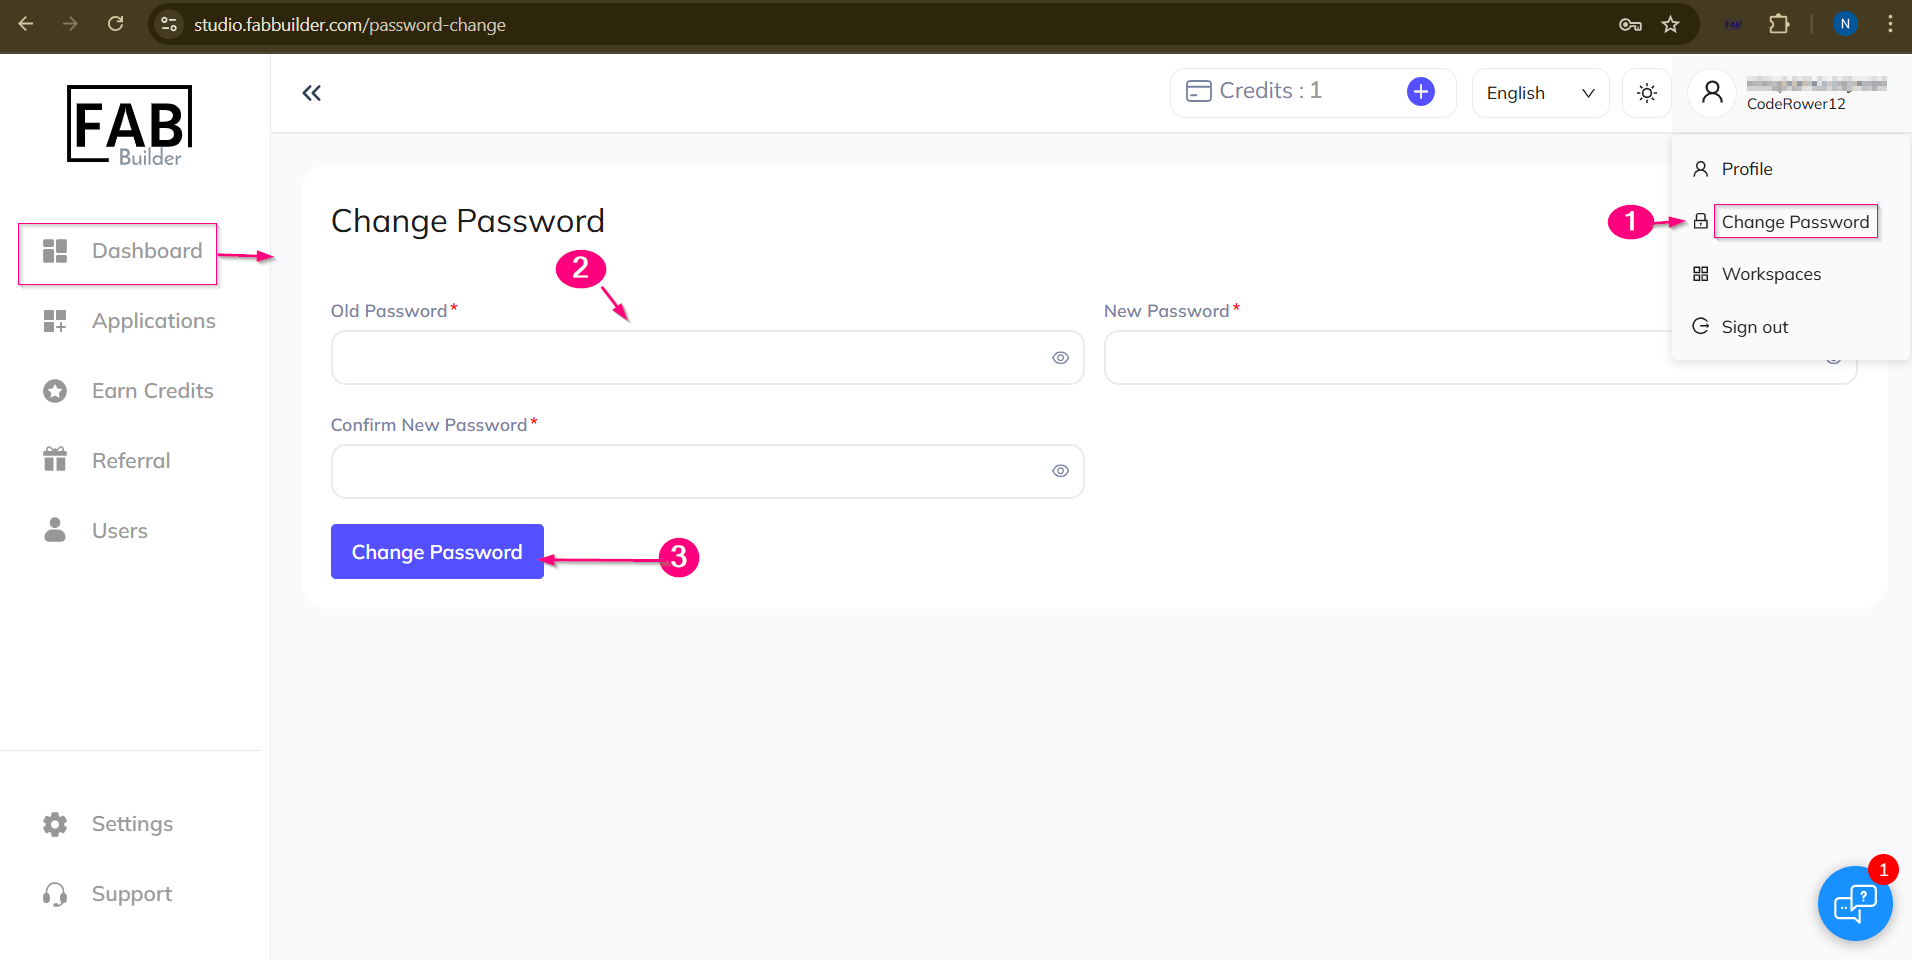
Screen -Change Password
1.1.3 Workspace
A workspace acts as a virtual environment where users can organize and manage their projects, teams, settings, and related resources. Within the section, user is allowed to perform the action mentioned below:
· Add new workspace to start new projects or organize the work separately.
· Edit the existing workspace to updates its name, setting.
· Delete the workspace that is no longer needed.
User can access this section by –
1. Clicking on the profile button on top panel. This action will open the drop-down menu includes workspace section.
2. Click on the workspace tab to open new screen to update the workspace setting.
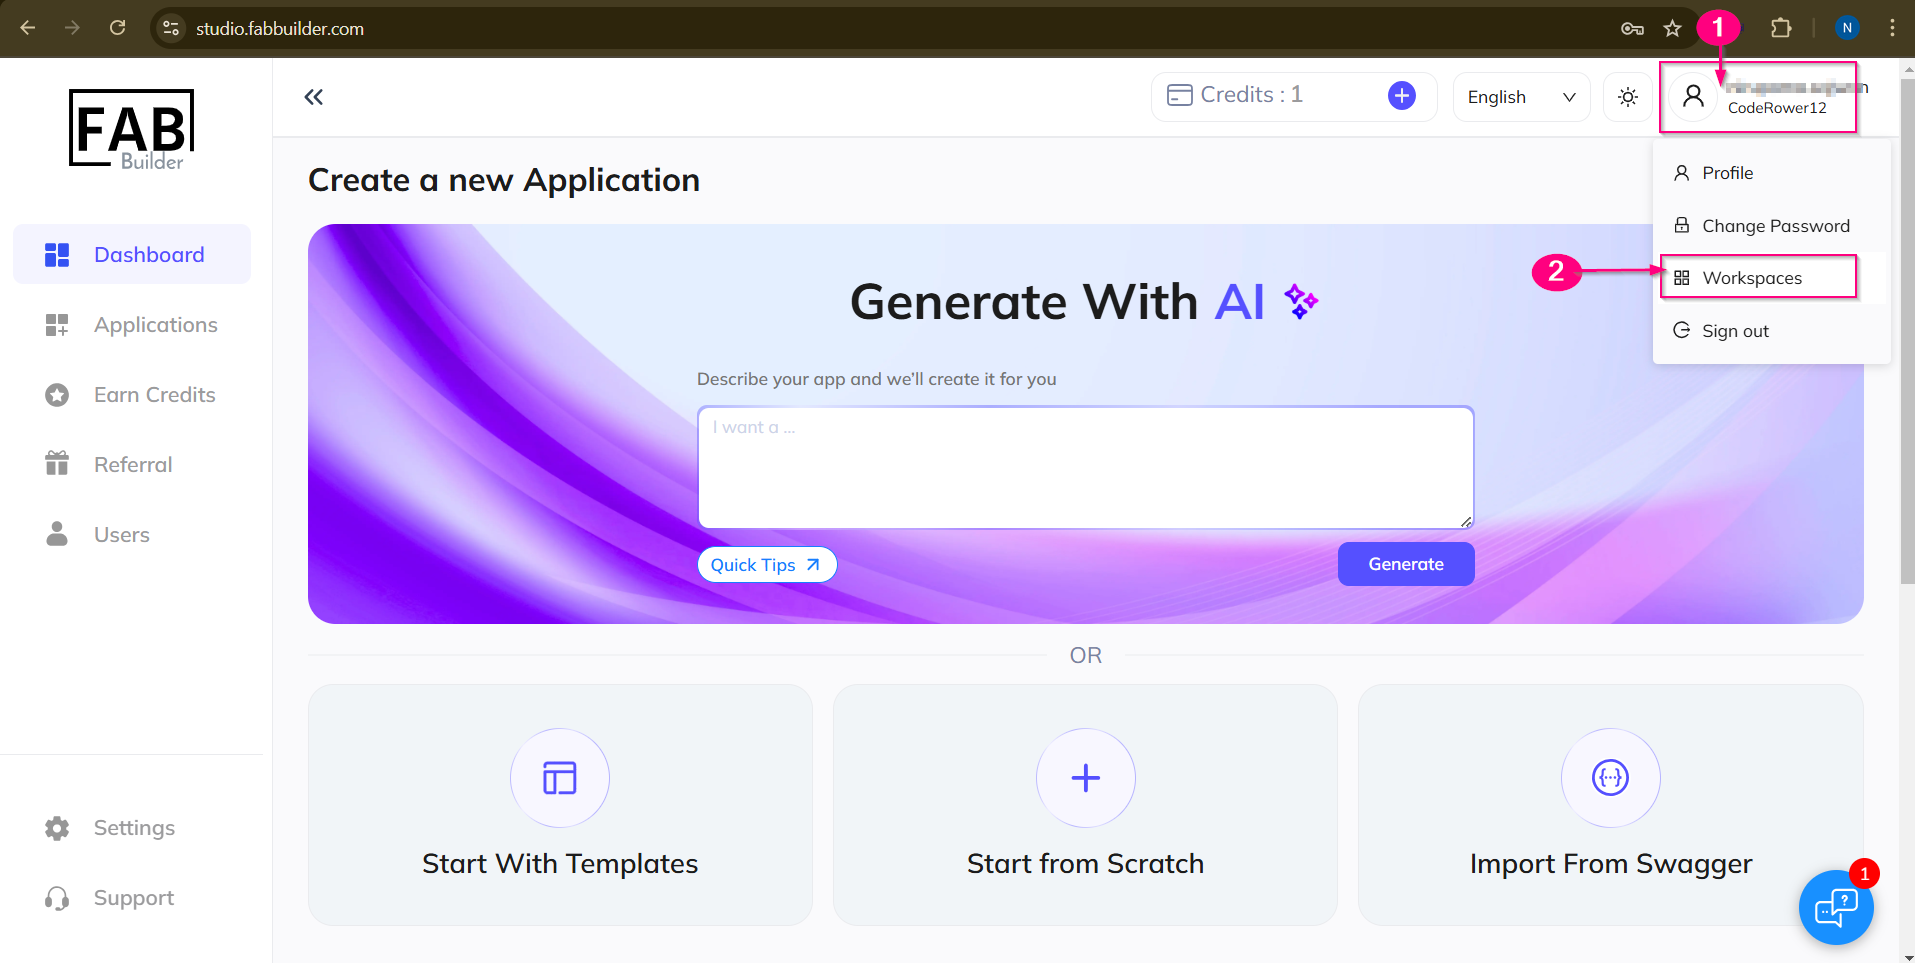
Screen- Access to Workspace
After clicking user is taken to the workspace setting screen which provide an access to edit and add new workspace by clciking on respective tabs.
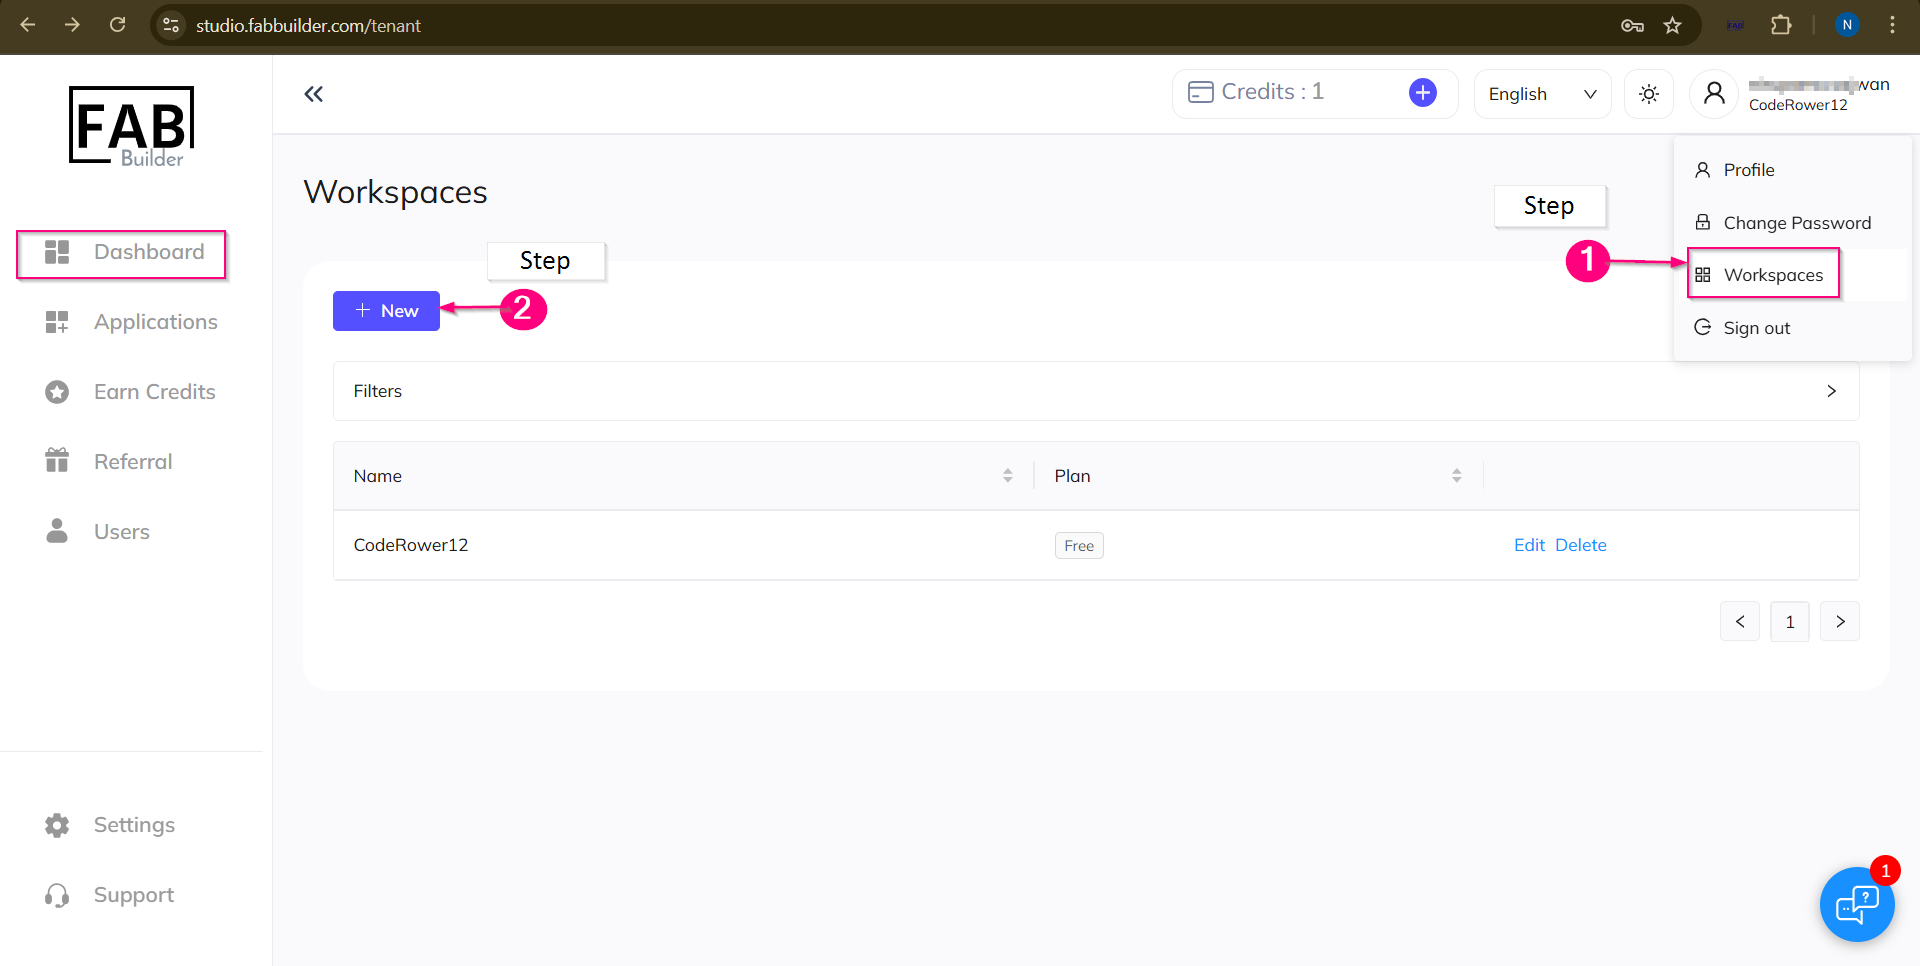
Screen- Workspace
Add New Workspace
use can add new workspace by foolowing the step outline below
1.Click on workspace tab listed on drop down menu.
2. Click on the New tab(workspace screen). A new screen to add new workspace will open.
Fill the details and save the new workspace.
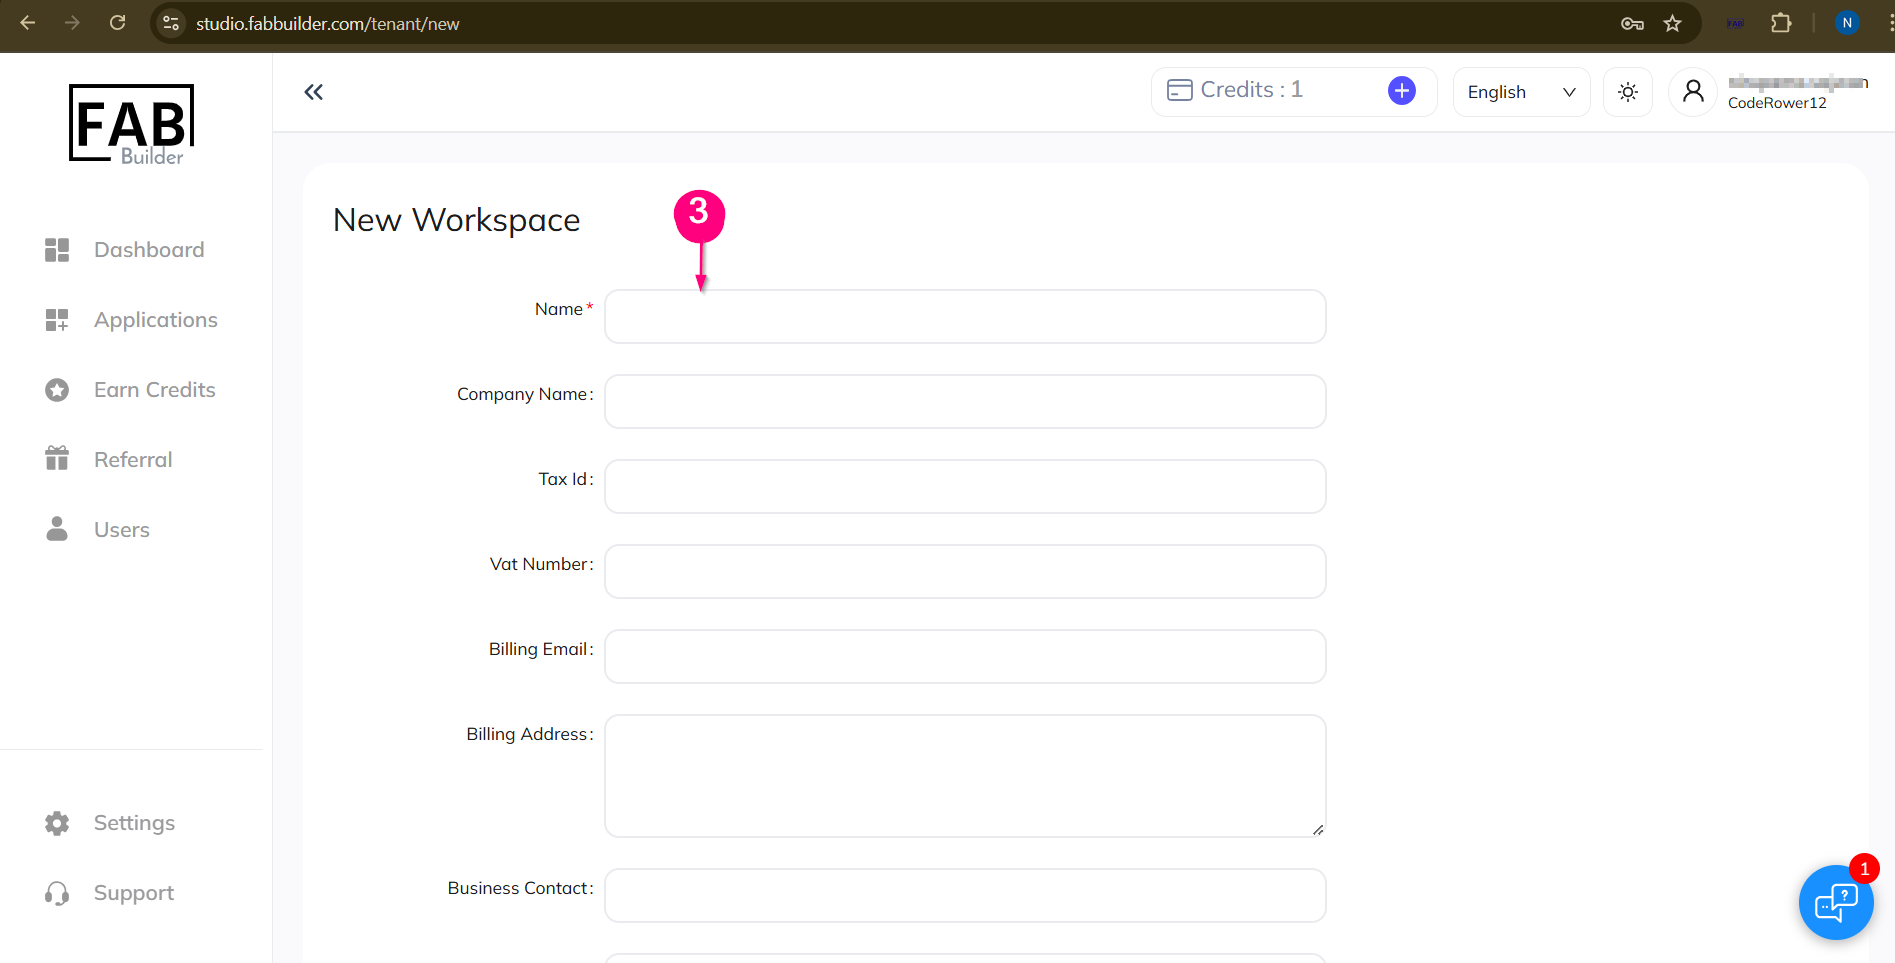
Screen- Form to Add New Workspace Details
A the new added workspace can be view on workspace screen area.
In the above screen, user can switch between the different workspaces by selecting workspace button.
1.1.3.2 Edit Workspace
Workspace screen gives the access to edit the details of existing workspace by clicking on edit button.
1.click on workspace button from the drop down menu
2.Click on edit tab.A new screen to edit form will displayed after clciking.
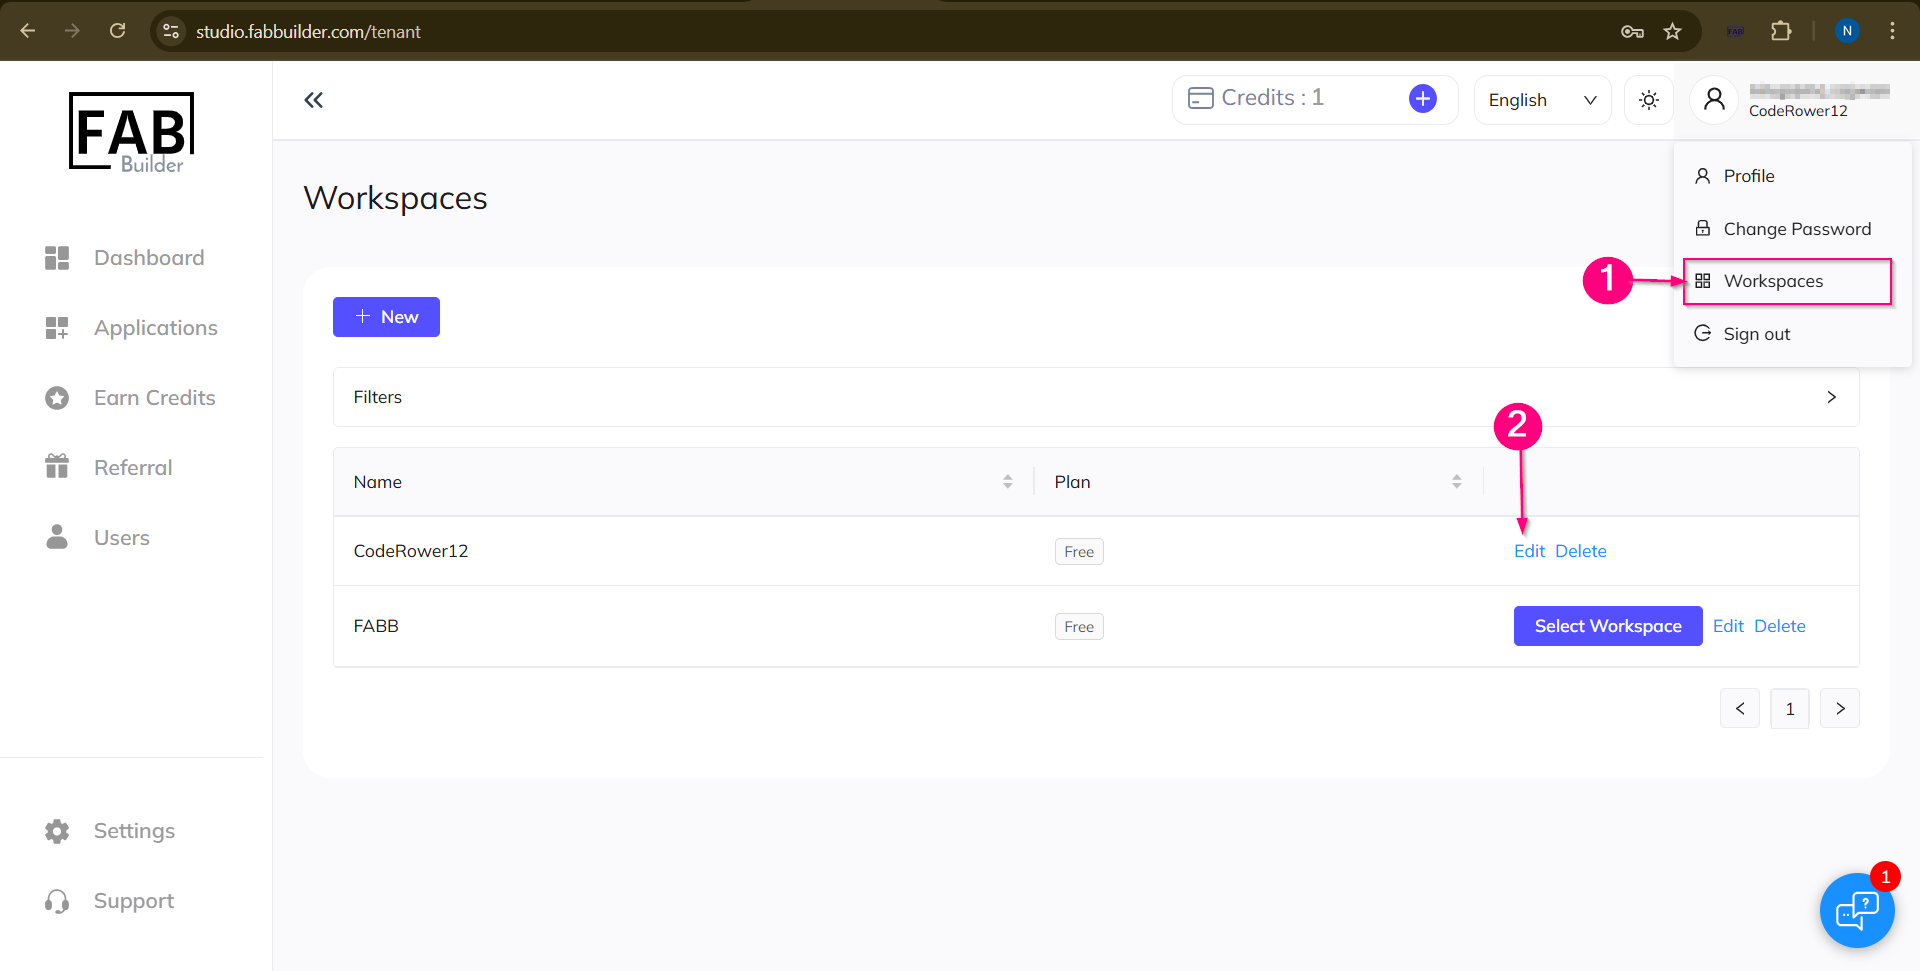
Screen-Edit/Delete Workspace
After clicking on Edit tab edit form will be displayed on screen
3.Edit the details and click to save .
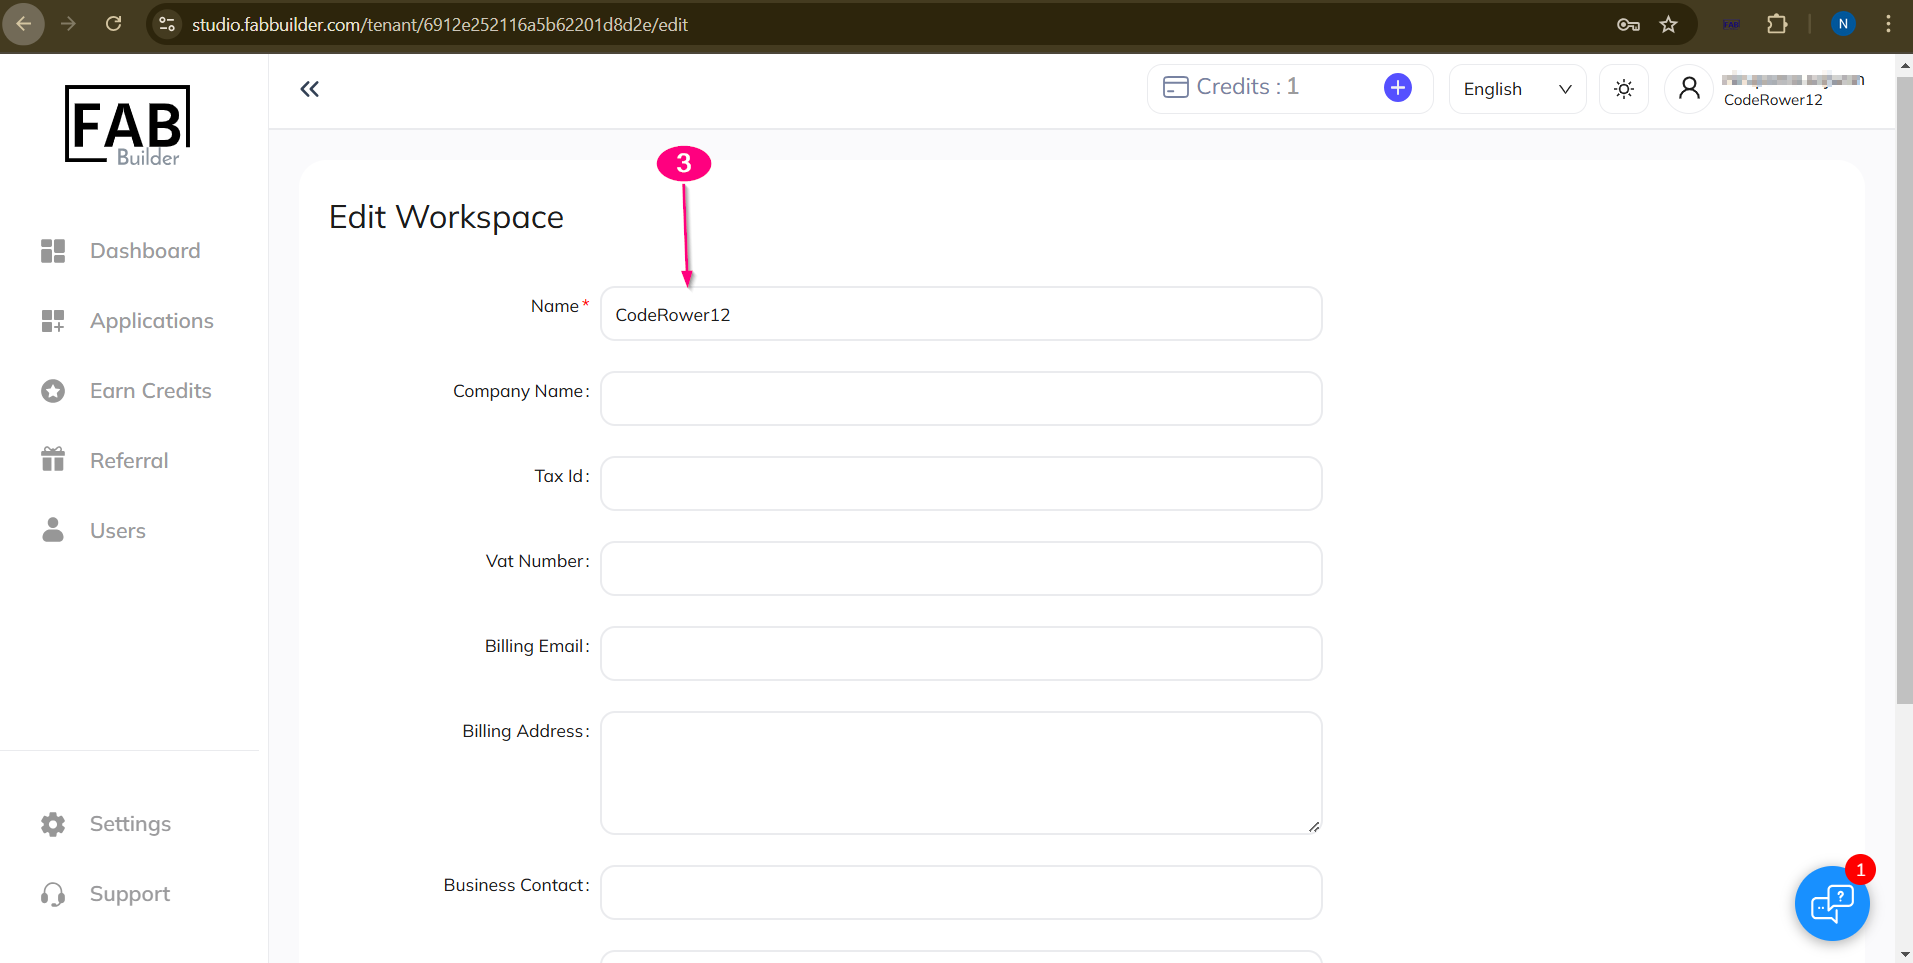
Screen- Edit workspace Form
on same screen of edit workspace user can also delete a workplace by clicking on the delete button available on workspace screen if no longer needed.
Note: Deleting a workspace is usually irreversible and may remove all associated data.