Fab Builder Bot (Git Hub App)
Fab Builder Bot is a GitHub App that helps users automatically push generated code to their GitHub repositories. It works with the Fab Studio platform, where users can generate web or app code. Once the code is ready, Fab Builder Bot takes care of the Git operations, making it simple for non-technical users or beginners to push their code into GitHub.
Key Features
Automatic Code Push— Once you generate your application in Fab Studio, Fab Builder Bot can push the code directly to users GitHub repository.
One-Time Setup— Users just need to install Fab Builder Bot and authorize it to access GitHub account and select repository.
No Manual Git Commands— Users don’t need to run git init, git push, or any Git commands manually. The bot handles everything.
Secure Access — It uses GitHub's permissions to safely access only the repositories user allows.
Prerequisites for Publishing the Code
Before the user starts using Fab Builder Bot to push code from Fab Studio to GitHub, ensure the following:
- GitHub Account- The user must have an active GitHub account.
- Fab Studio Account-The user needs an active Fab Studio account with generated application code ready for deployment.
- GitHub Repository Access-The user should have permission to make changes to the GitHub repository where the code will be pushed.
- Generated Application Code-The application code must be generated and ready in Fab Studio.
- Internet Connection-A stable internet connection is required to connect Fab Studio and GitHub.
- Fab Builder Bot Installation-The user must install and authorize the Fab Builder Bot GitHub App via Fab Studio.
- Sufficient Credits in Fab Studio-The user must ensure at least 1 credit is available in their Fab Studio account to publish code.
Installing Fab Builder Bot
1. Click “Connect to GitHub” in Fab Studio
On clicking the Connect to GitHub button in Fab Studio, user is redirected to GitHub.
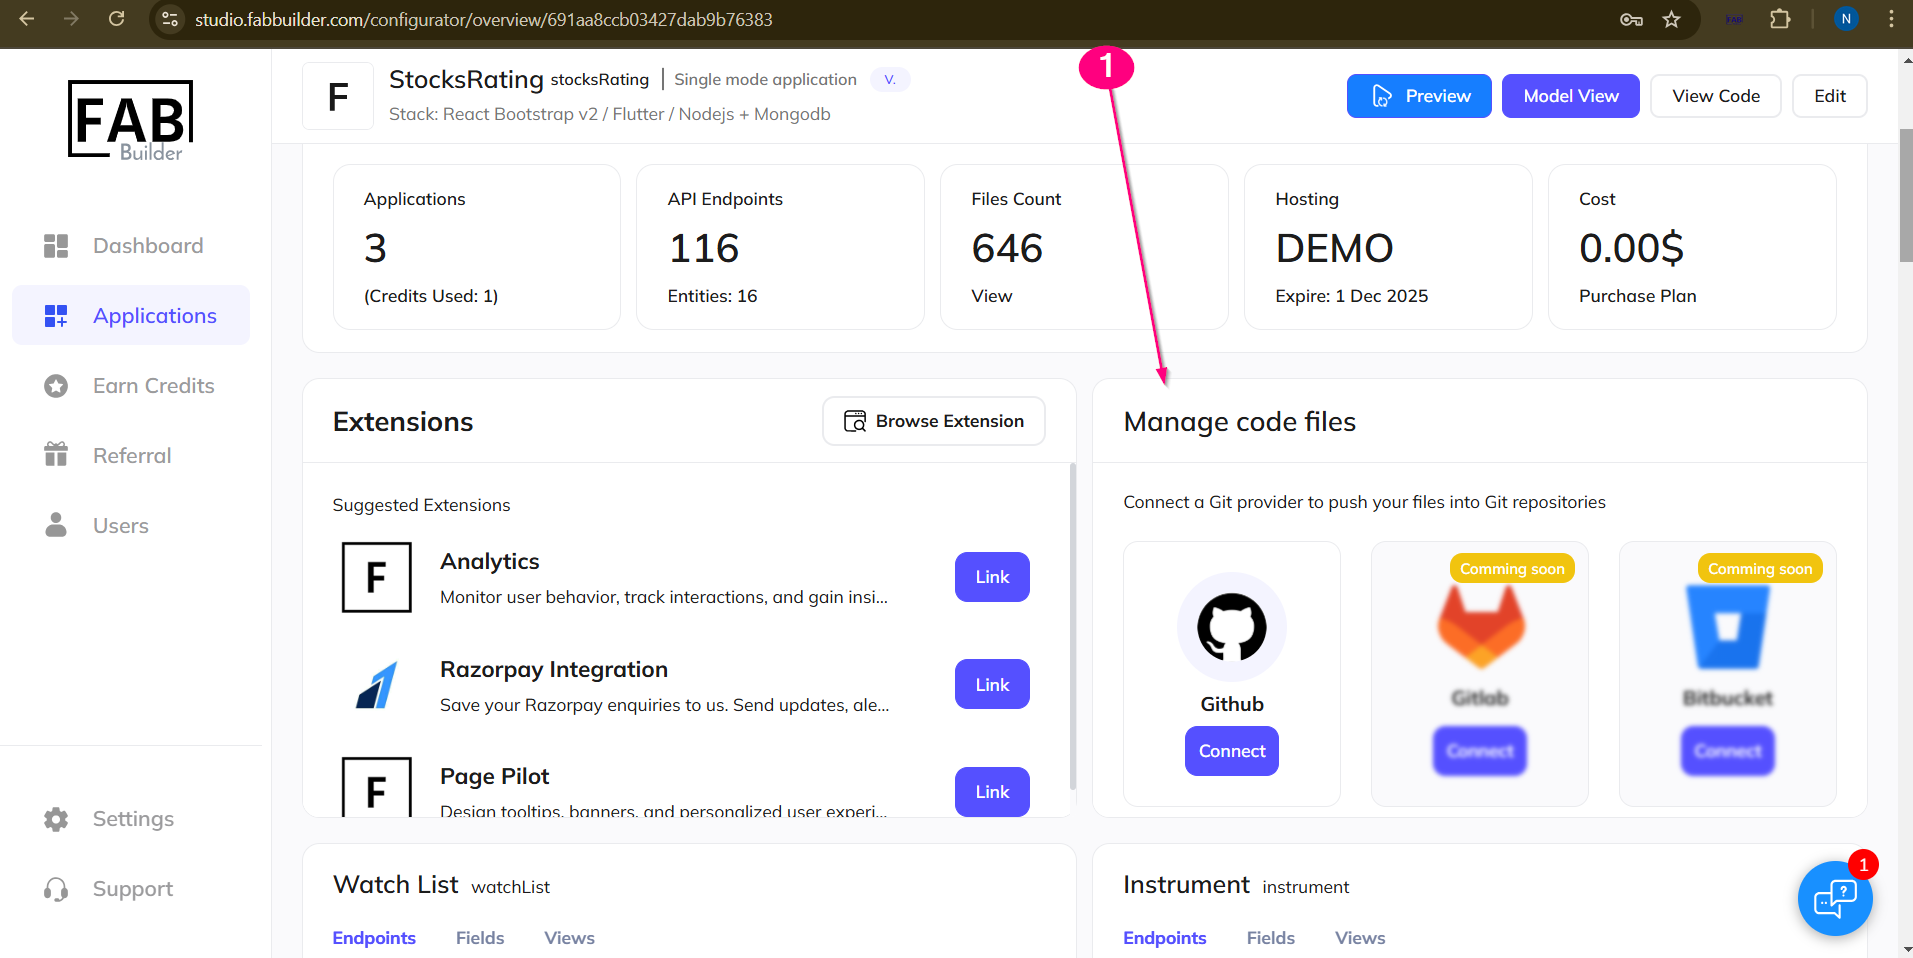
Screen: Access To Git Hub
In this single screen, you can:
· Authorize Fab Studio to connect with your GitHub account.
· Install the Fab Builder Bot GitHub App.
2. Authorize and Install
The GitHub screen will show an option to authorize access and install the bot for selected repositories.
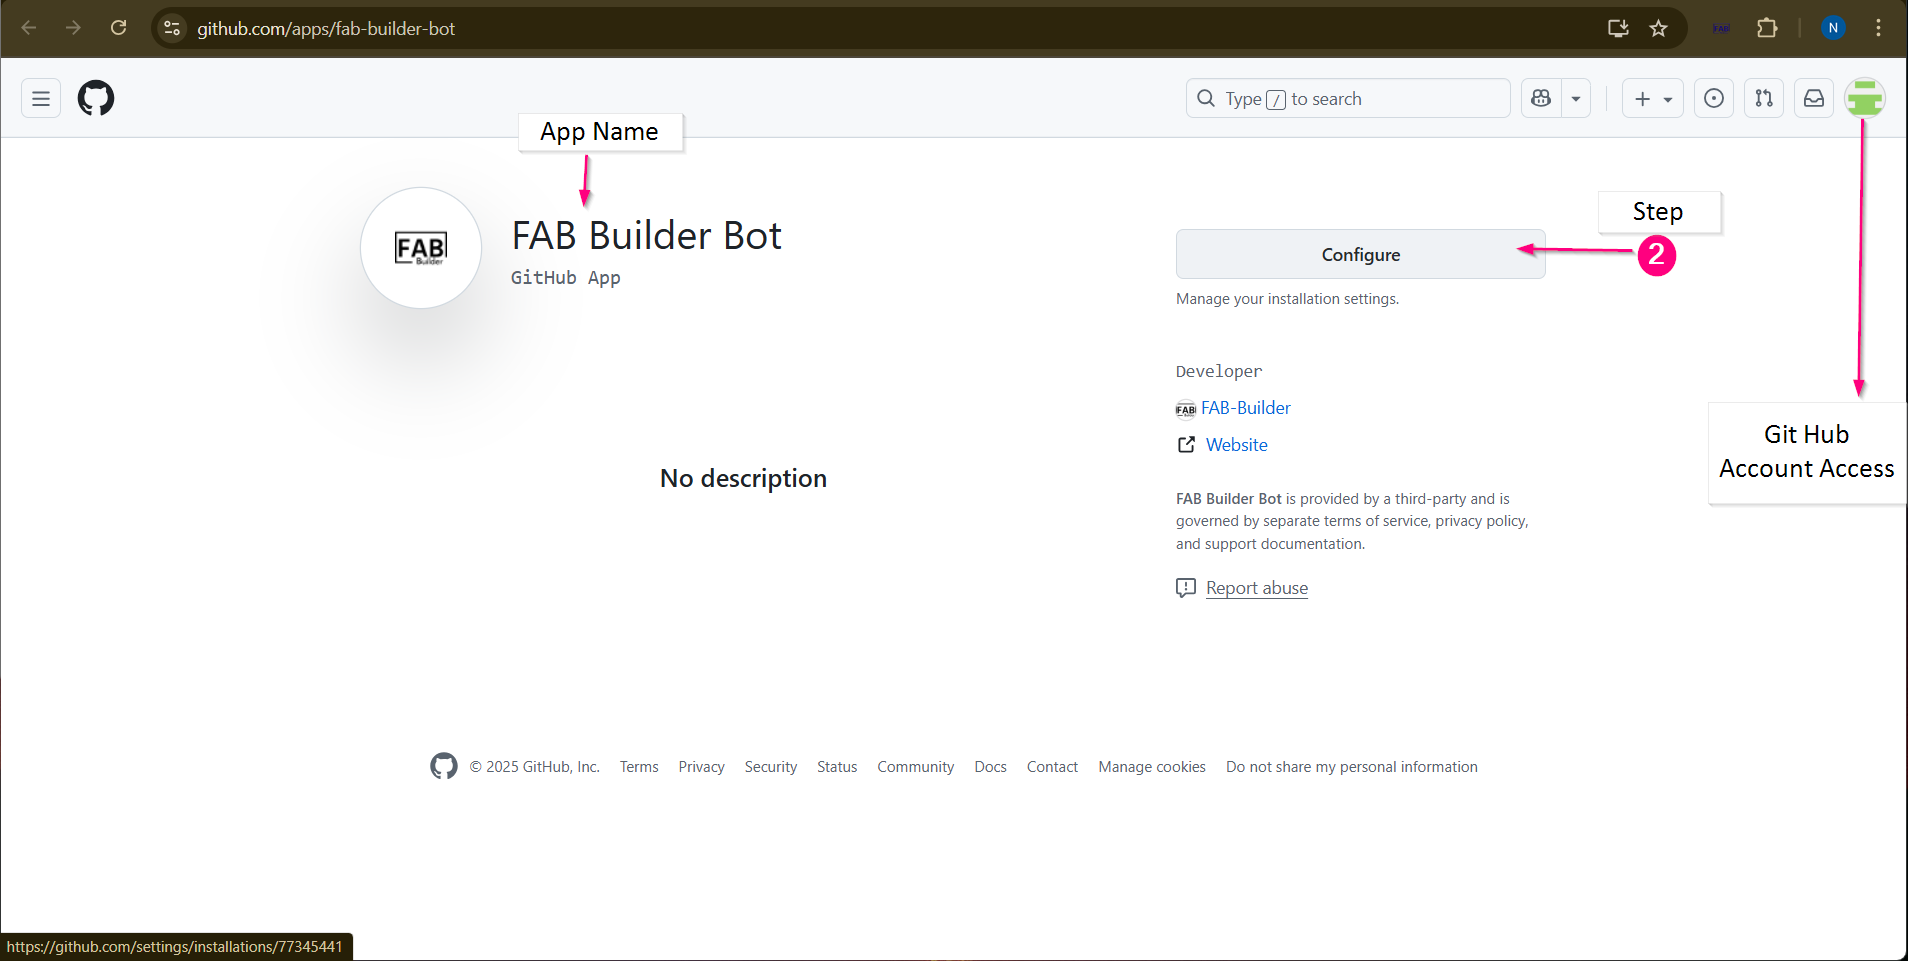
Screen- FAB Builder Bot Installation
After clicking on Install button user is redirected to next screen of install and authorize. User can select the option of repositories access (currently selected all repositories) and click on Install & Authorize button.

Screen- GitHub authorization + installation page (combined).
Publishing the code
1. Select The Application
After completing the above step (install and authorise), the user is redirected to the Fab Studio Dashboard.

Screen- Dashboard
User can view or select the created application by scrolling down the side tool bar on the Dashboard or by navigating the Application Module.

Screen- Dashboard/Application List
Now, click on the application name from the Application List (whose code has been built successful- prerequisite) to push the code to GitHub.
2. Select the tech stack of application to Push Code
Once you click the application, you will be redirected to the Application Configurator screen. Here, you will find the Manage File card, which allows you to push the code to GitHub using the Fab Builder Bot by selecting one of the tech stacks (currently backend is selected) and click on save button.
Note: The Stacks filter menu displays a list of application names, which may include applications (ecommerce-web) other than the one currently selected (e.g., APP Product order 123).

Screen- To Push the code of tech stack to GitHub
3. Next step will display Publish button to send the code to the selected repository (Amangupta/ecommerce -web) with edit button.

Screen – Access to Publish Button
4. Publish Source Code to GitHub
When user is ready to push generated code to GitHub repository, Fab Studio displays the Publish dialog.
· New Entity, Updated Entity, and Deleted Entity sections show changes in application code.
· Click the Publish Source Code to GitHub button to automatically push all changes to connected repository via the Fab Builder Bot.

Screen – Pop Up of Publish Source Code
5. Publishing Confirmation
After clicking Publish in the Manage Code Files section, a confirmation dialog will appear. This dialog informs user that publishing code will consume 1 credit from user’s account.
· To proceed, click OK.
· To cancel and return to the previous screen, click Cancel.

Screen- Publish code
Fab Builder Bot (Git Hub App)
Fab Builder Bot is a GitHub App that helps users automatically push generated code to their GitHub repositories. It works with the Fab Studio platform, where users can generate web or app code. Once the code is ready, Fab Builder Bot takes care of the Git operations, making it simple for non-technical users or beginners to push their code into GitHub.
Key Features
Automatic Code Push— Once you generate your application in Fab Studio, Fab Builder Bot can push the code directly to users GitHub repository.
One-Time Setup— Users just need to install Fab Builder Bot and authorize it to access GitHub account and select repository.
No Manual Git Commands— Users don’t need to run git init, git push, or any Git commands manually. The bot handles everything.
Secure Access — It uses GitHub's permissions to safely access only the repositories user allows.
Prerequisites for Publishing the Code
Before the user starts using Fab Builder Bot to push code from Fab Studio to GitHub, ensure the following:
- GitHub Account- The user must have an active GitHub account.
- Fab Studio Account-The user needs an active Fab Studio account with generated application code ready for deployment.
· GitHub Repository Access-The user should have permission to make changes to the GitHub repository where the code will be pushed.
· Generated Application Code-The application code must be generated and ready in Fab Studio.
- Internet Connection-A stable internet connection is required to connect Fab Studio and GitHub.
- Fab Builder Bot Installation-The user must install and authorize the Fab Builder Bot GitHub App via Fab Studio.
- Sufficient Credits in Fab Studio-The user must ensure at least 1 credit is available in their Fab Studio account to publish code.
Installing Fab Builder Bot
1. Click “Connect to GitHub” in Fab Studio
On clicking the Connect to GitHub button in Fab Studio, user is redirected to GitHub.

Screen: Access To Git Hub
In this single screen, you can:
· Authorize Fab Studio to connect with your GitHub account.
· Install the Fab Builder Bot GitHub App.
2. Authorize and Install
The GitHub screen will show an option to authorize access and install the bot for selected repositories.

Screen- FAB Builder Bot Installation
After clicking on Install button user is redirected to next screen of install and authorize. User can select the option of repositories access (currently selected all repositories) and click on Install & Authorize button.
Screen- GitHub authorization + installation page (combined).
Publishing the code
1. Select The Application
After completing the above step (install and authorise), the user is redirected to the Fab Studio Dashboard.
Screen- Dashboard
User can view or select the created application by scrolling down the side tool bar on the Dashboard or by navigating the Application Module.
Screen- Dashboard/Application List
Now, click on the application name from the Application List (whose code has been built successful- prerequisite) to push the code to GitHub.
2. Select the tech stack of application to Push Code
Once you click the application, you will be redirected to the Application Configurator screen. Here, you will find the Manage File card, which allows you to push the code to GitHub using the Fab Builder Bot by selecting one of the tech stacks (currently backend is selected) and click on save button.
Note: The Stacks filter menu displays a list of application names, which may include applications (ecommerce-web) other than the one currently selected (e.g., APP Product order 123).
Screen- To Push the code of tech stack to GitHub
3. Next step will display Publish button to send the code to the selected repository (Amangupta/ecommerce -web) with edit button.
Screen – Access to Publish Button
4. Publish Source Code to GitHub
When user is ready to push generated code to GitHub repository, Fab Studio displays the Publish dialog.
· New Entity, Updated Entity, and Deleted Entity sections show changes in application code.
· Click the Publish Source Code to GitHub button to automatically push all changes to connected repository via the Fab Builder Bot.
Screen – Pop Up of Publish Source Code
5. Publishing Confirmation
After clicking Publish in the Manage Code Files section, a confirmation dialog will appear. This dialog informs user that publishing code will consume 1 credit from user’s account.
· To proceed, click OK.
· To cancel and return to the previous screen, click Cancel.
Screen- Publish code